
Les frères Perry nous ont gratifié d'une petite liste guerre des roses pour Hail Caesar du FB :
Les listes :


Le déploiement :

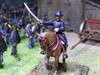
Quelques photos :


Les autres photos !
A+
The Battle of Mortimer's Cross 1461
Our mate Chris was up so we thought we'd subject him to a War of the Roses game. Michael decided on Mortimer's Cross, preparing the terrain and forces. The rules we used were 'Hail Caesar' but with the WotR's unit stats provided by Rick Priestly. Chris hadn't played a medieval game for many years but insisted on being Lancastrian as he had been of that persuasion during his re-enactment years. He was joined and 'helped' part way through the game by Aly Morrison. Alan played the Yorkist faction and Michael umpired...again.
As with many War of the Roses battles exact deployment of 'Battles'(divisions) is uncertain, so Michael, with the view of making the game more exciting, began proceedings with each division dicing to march onto the field to form up. For the game, two of the Yorkist Battles were coming south down the road from Wigmore Castle while the third with Edward, Earl of March, joined them from Croft Castle on the other side of the River Lugg. Jasper and Owen Tudor Lancastrian Battles together with the Earl of Wiltshire's French, Breton and Irish mercenaries started from the wagon park at the southern end of the table.
Chris started well with two divisions moving out of their camp, Jasper Tudor's Battle forming line and pushing forward. For the Yorkists it was a little slower progress with Sir Walter Devereux's Battle just starting to fan out beyond the hamlet from the road and Edward's Battle just reaching the bridge. The next turn and Chris's dice again were lucky moving up Jasper's men hurriedly to their front to try and pin the Yorkist movement. Owen Tudor's Battle led by Aly marched behind, heading to their left to outflank Alan. The mercenary contingent was also on the move filling the very small gap left on Jasper's right and the River Lugg. Alan then got a bit of a spurt on managing to shake out Devereux's men into line and bring up Sir William Herbert's Battle to move to his right flank to oppose Aly. Edward's division moved slow across the Lugg and formed up the heavy horse, the only heavily armoured cavalry unit in the game, near the bridge.
This was about when the luck of the dice changed for Chris. The Yorkists in the centre were out shooting the more numerous Lancastrians opposite and Aly threw a 'blunder' with his light horse taking one unit off the table. Alan then attached Edward to the heavy horse and using a 'follow me' order charged the end of Jasper's Battle. No casualties were caused on the horse by arrows on their way in but the clash was one sided. This was mainly down to poor dice rolling by Chris and flukey rolling by Alan but the Yorkist horse won 7-2 and scattered the infantry. In the next turn the mercenaries moved to support the next unit to be trampled on but another unit was crushed. Else where more casualties were mounting up for the Jasper's men in the centre and Aly began to form line on Alan's flank.
In the next turn another of the French units was wiped out by Edward's horse, at which point Edward left the unit and retired to try and bring up his infantry. The mercenaries contingent was broken and fell back. The horse carried on into another of Jasper's household units, destroying them. This was now half of Jasper's Battle gone and so the division was broken and with it the Lancastrian army. So the result was as the original battle although in the game it was all down to that one heavy horse unit, possibly a little too pokey, and good and bad dice!
Les listes :
Le déploiement :
Quelques photos :
Les autres photos !
A+